
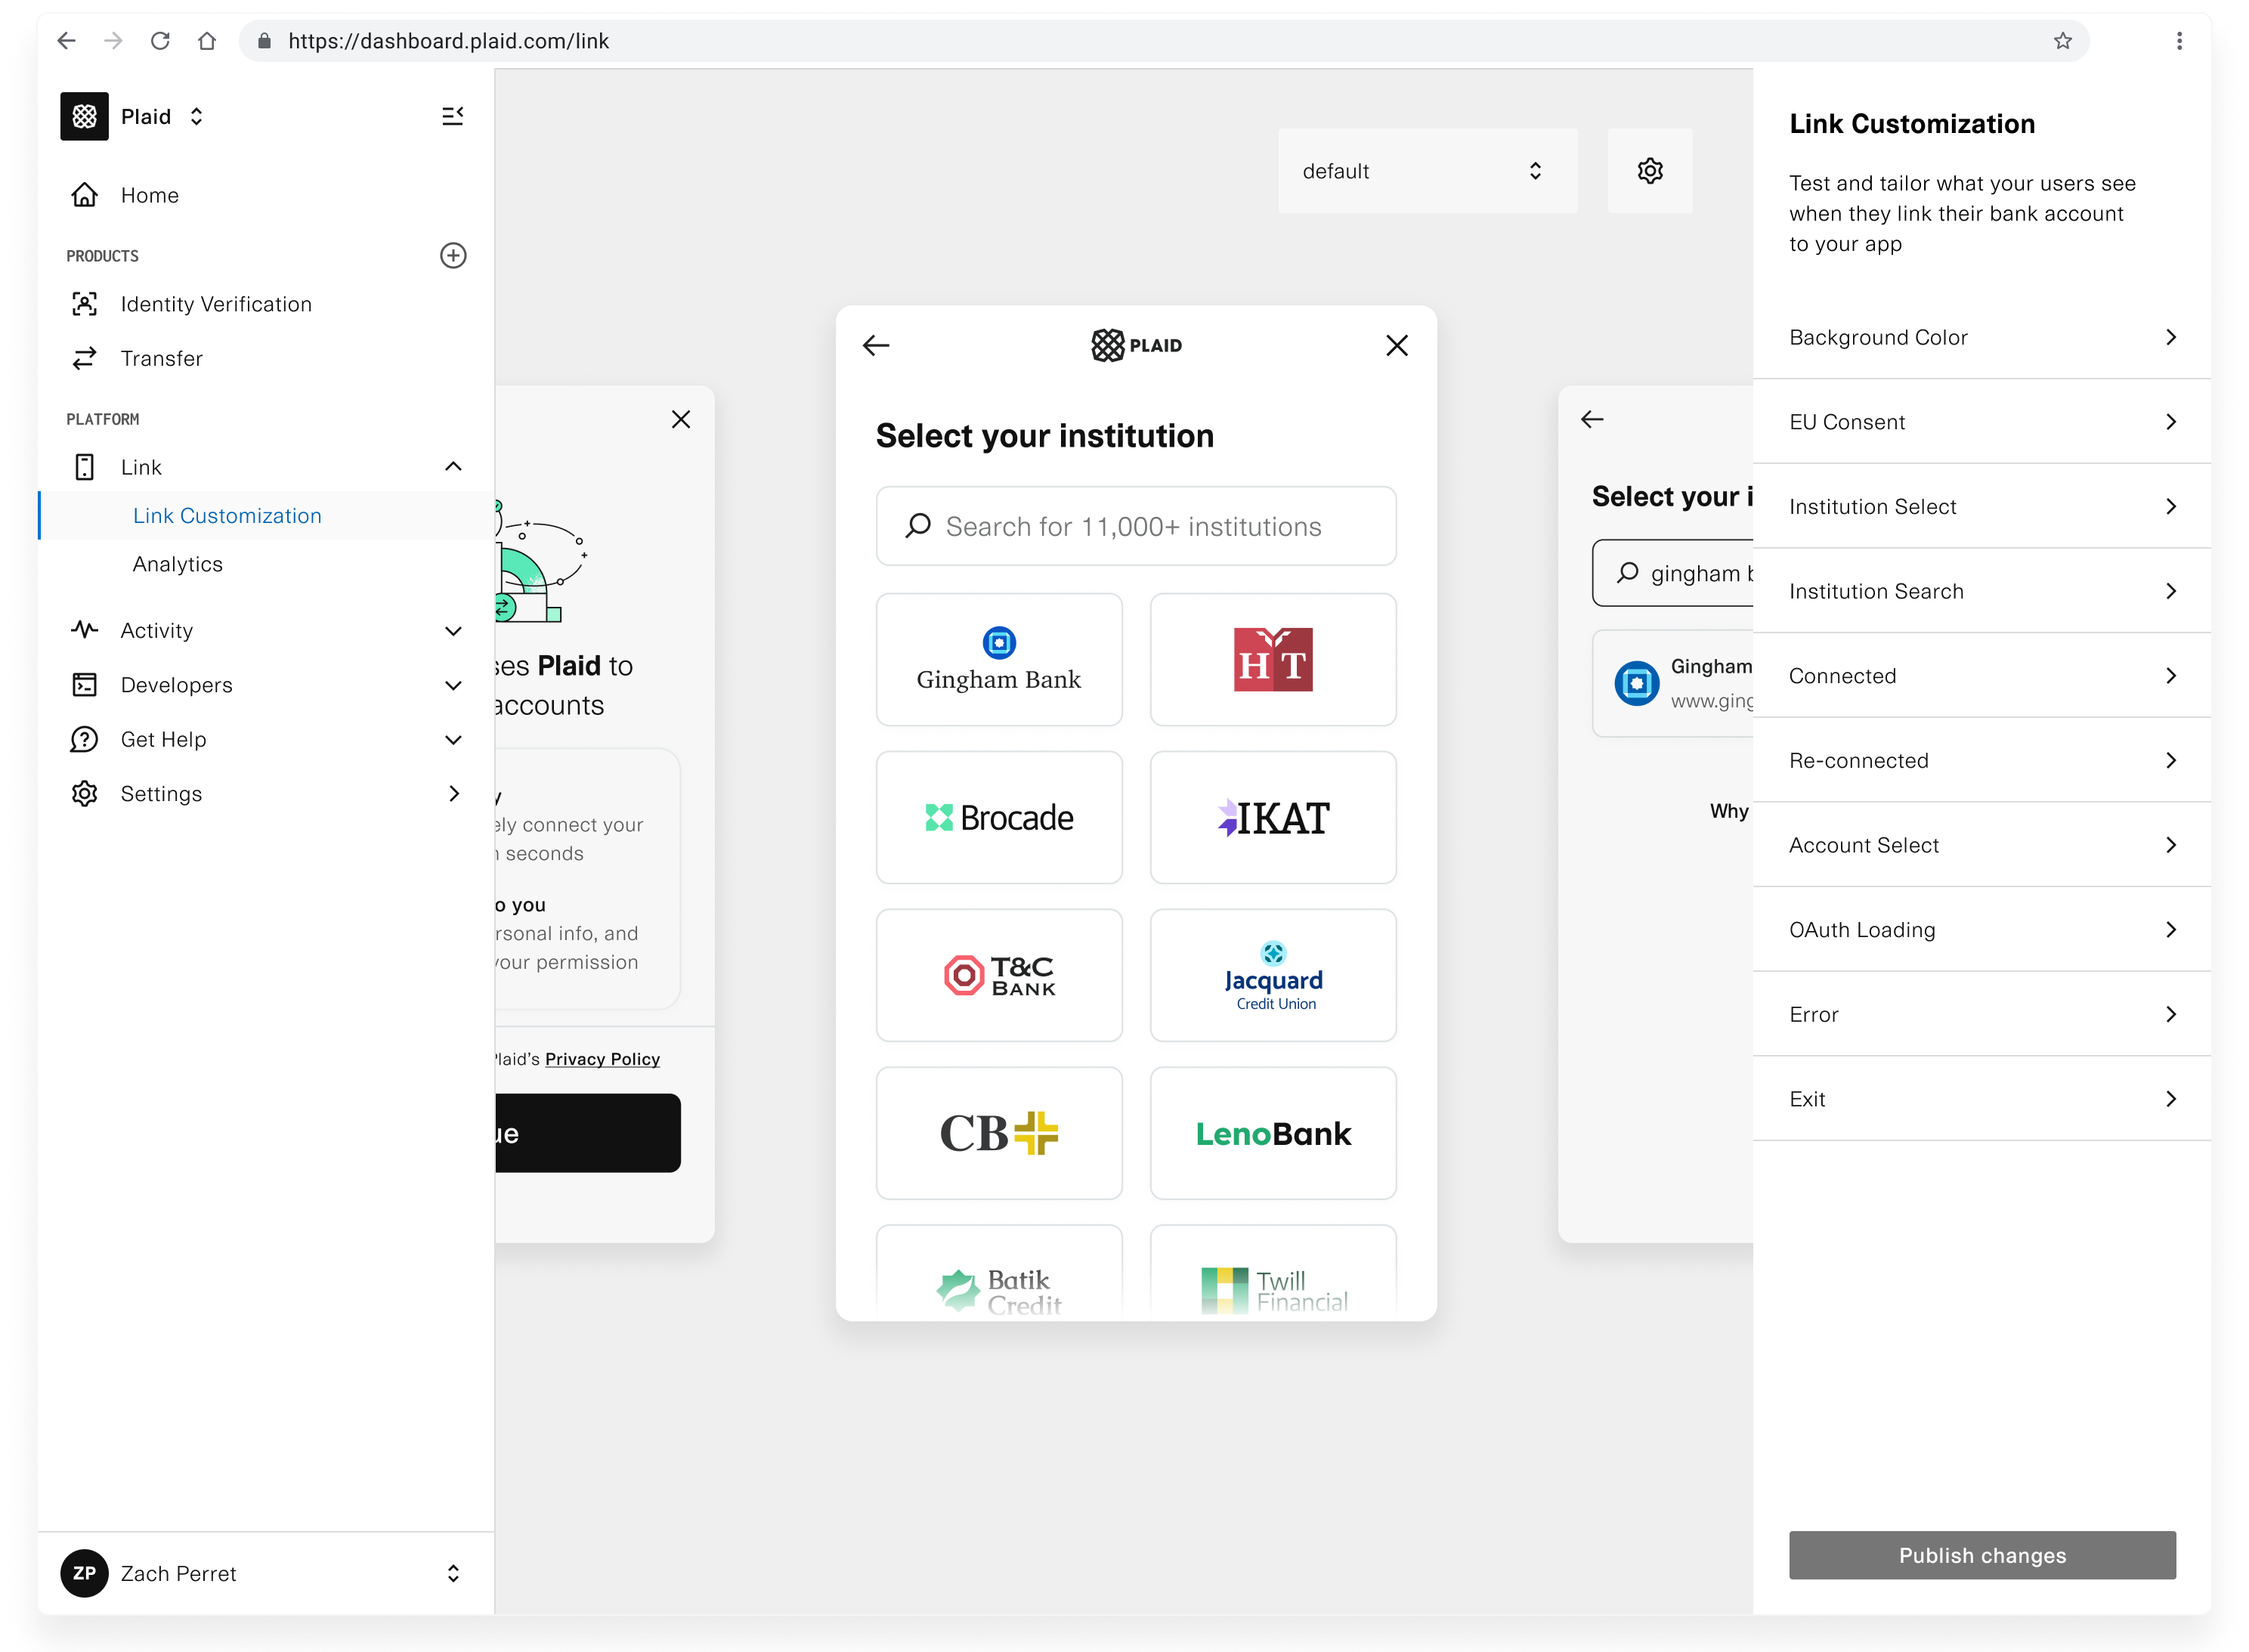
Link customization
Learn how to customize the Link UI for your app
Link customization overview
You have the ability to customize multiple parts of the Link UI from the Plaid Dashboard.
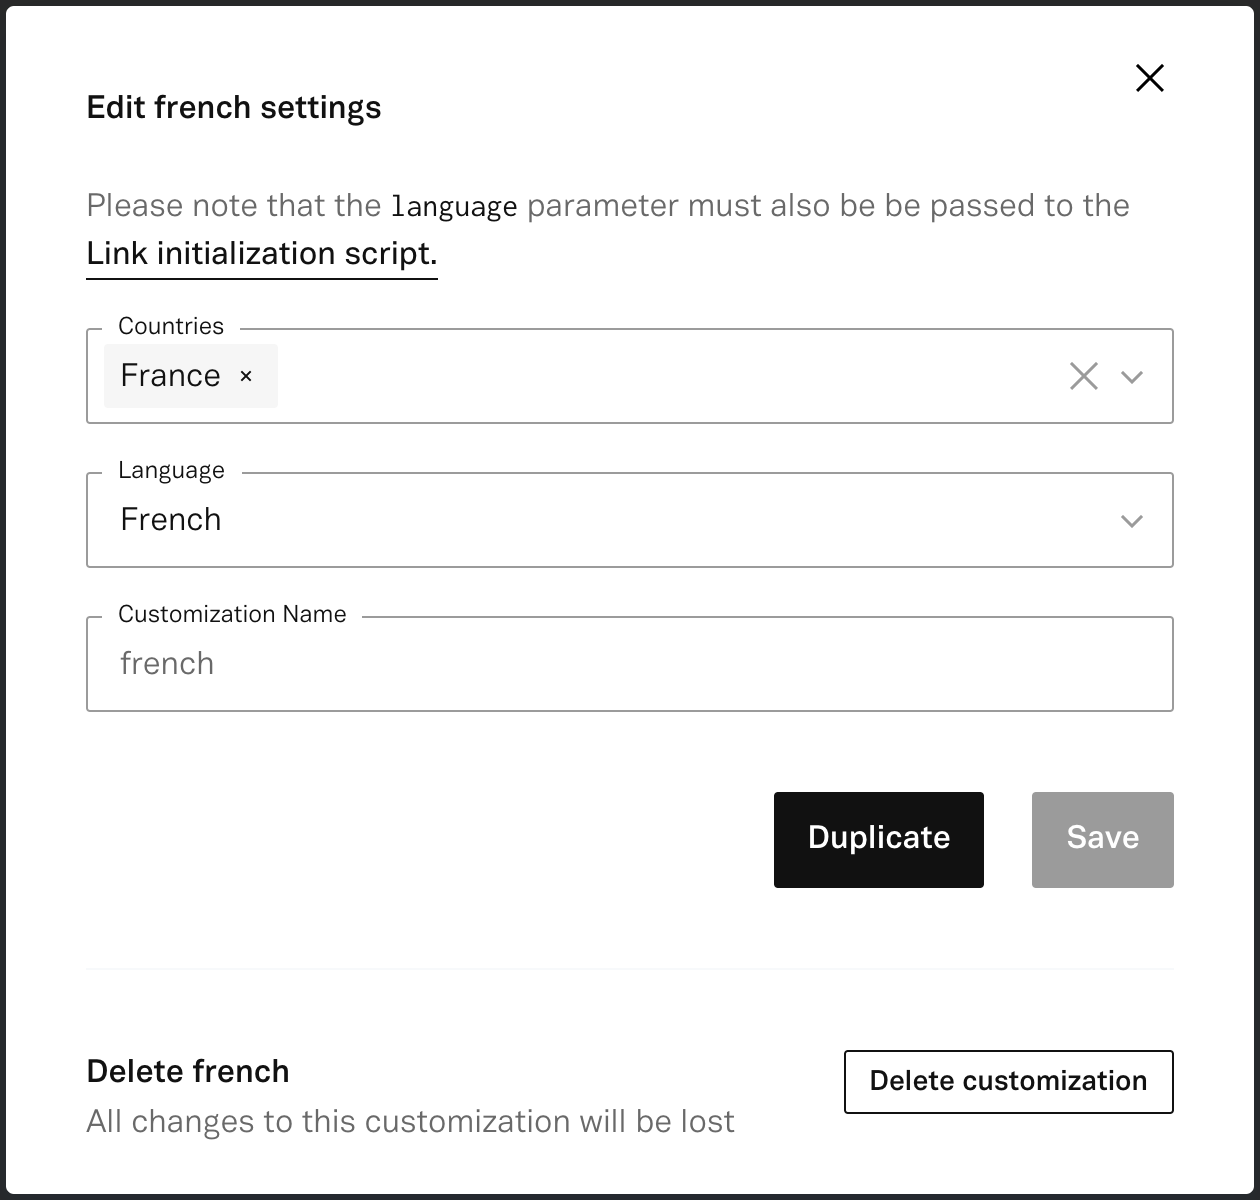
You can create multiple Link customizations in order to show different versions of Link to different users. For example, you can show an English-configured customization to users who have set their language to English, and a French-configured customization to users who have set their language to French.
Link customizations can also be used to create different segments for the purposes of tracking conversion rates and other analytics differences between different Link configurations. You can track this yourself, or, for customers with Premium Support Packages, Plaid can show the performance of different configurations in the Dashboard. For more details, see Link analytics.
To create a customization, access the Link menu within the Plaid Dashboard and select Link Customization. You can then create a new customization by clicking on the drop-down menu in the upper right and selecting Create new customization. Or, to create a customization based on an existing customization, open the settings pane, accessible via the gear icon in the upper-right corner of the Link customization page, and use the Duplicate button. From the settings pane, you can also modify the countries and languages the customization applies to, as well as change its name.
To use a customization, set the link_customization_name parameter to the customization name when calling /link/token/create.
In order for a customization to be applied, the language and country settings in Link must exactly match those specified in the customization. For example, a customization with the country set to United States and Canada will not be applied if the country_codes setting provided to /link/token/create is ['US']; it must be ['US', 'CA'].
Account Select
The Account Select pane is a required pane where users indicate which accounts they want to share data for.
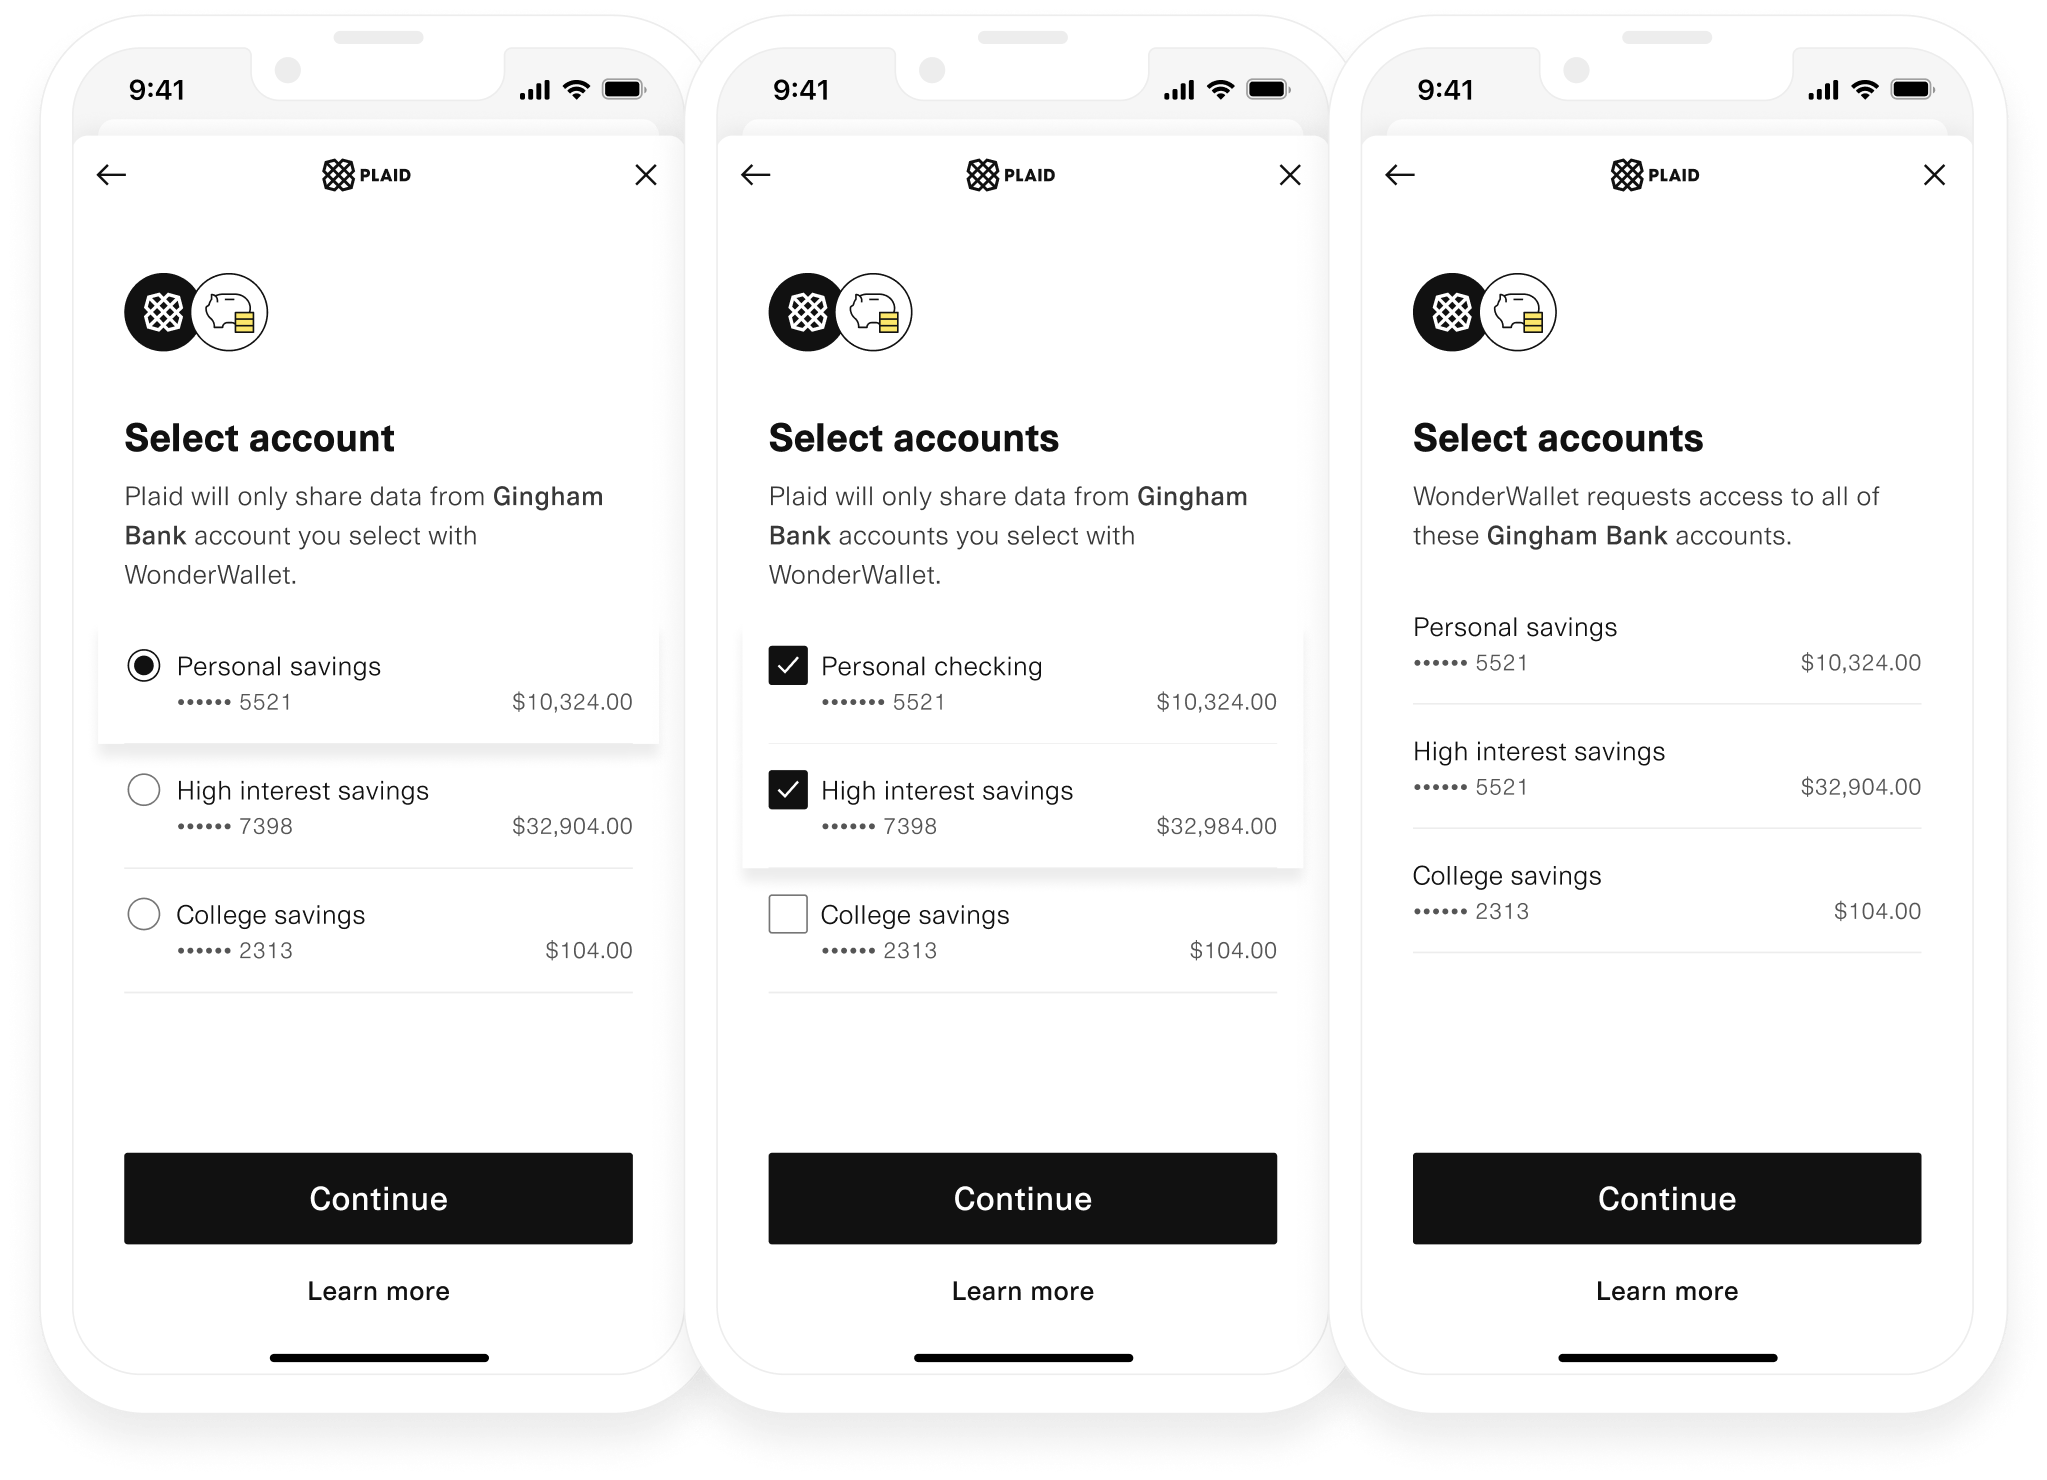
This pane can be configured to allow for single account selection, multi account selection, or all accounts preselected. Your use case may influence the setting you want to choose:
- If your Plaid use case is banking, consumer payments, or wealth, we recommend that you use the "Enabled for one account" or the "Enabled for multiple accounts" view behavior.
- If your Plaid use case is personal financial management or lending, you may prefer to use the "Enabled for all accounts" view behavior. When a user connects their account via a financial institution's OAuth flow, the Account Select pane may be skipped if Plaid determines that the flow has already fulfilled the account selection step (e.g. if Link is customized to enable multiple accounts to be selected and the financial institution's OAuth flow supports this step, Plaid's Account Select pane will not be shown).
Note that if you have enabled multi account selection or all accounts selected, this behavior may be overridden in Link during Link flows that do not support the usage of multiple accounts. For example, the Instant Match and Automated Micro-deposits Auth flows require the user to enter the account and routing number for a specific account, and can only be used with one account at a time. In these cases, Link will present a single account selection flow, regardless of your customization settings.
After a user selects their accounts and clicks Continue, the Connected pane will be shown. The selected accounts will be specified in the accounts property of the onSuccess() callback.
const onSuccess = useCallback<PlaidLinkOnSuccess>(
 (public_token: string, metadata: PlaidLinkOnSuccessMetadata) => {
   // updated selected account ids
   const account_ids = metadata.accounts.map(account => account.id);
   // ...
 },
 [],
);
Only the data for the selected accounts will be available for the accounts via the API. You can listen for NEW_ACCOUNTS_AVAILABLE webhooks to discover new accounts for the created Item and use update mode with Account Select enabled to request data to be shared for new accounts from your users.
For some older Items created before March 2023, data for all accounts may be available, even if the user did not select the account in Account Select, and access to new accounts may be granted without needing to use the update mode flow. If these Items are at OAuth institutions, they will be updated to use the current Account Select behavior when they are sent through update mode.
Language and country
You can select the language Link will appear in, as well as the countries it should support, on the settings pane, accessible via the gear icon in the upper-right corner. The list of countries selected will control which institutions are displayed in Link, as well as whether the OAuth pane will appear. The language setting will determine the default strings used in the Link UI. If you want to customize the translation, you can edit the strings, as described in the Text strings section below.
Language and country are also specified via /link/token/create, using the country_codes and language parameters. It is important that the /link/token/create parameters and customization settings match each other. If the language specified via language does not match the language selected for the customization, the customization will not be applied. If the country codes specified via country_codes do not match the country codes selected for the customization, the country codes selected for the customization may be overridden.
Plaid supports over a dozen languages and countries in Link and is continually adding more. For an up-to-date list of supported languages and countries, see the Dashboard or the API Reference.
For Identity Verification, the language Link appears in is instead automatically selected based on the end user's browser settings. For more details, see Identity Verification supported languages.
Color scheme
You can configure the color scheme used by Link to match your company's brand colors or website color scheme via the Background Color setting.
Text strings
You can change the text shown on some of the screens to customize the wording to your app. This setting can be configured via the Consent, Institution Select, Institution Search, Connected and Re-Connected settings.
Financial institutions
Plaid recommends a default list of financial institutions whose logos are shown on the bank selection screen. This list is personalized based on user data, such as location. This option is automatically enabled; the Automatic option is pre-selected in the Institution Select setting.
Alternatively, you can customize the list of institutions by choosing the Custom option, but this option may result in lower conversion.
(Document Income only) Document upload settings
If you are using the Document Income product, you can use Link customizations to individually enable or disable the different types of documents your customers are allowed to upload in Link. You can configure the following options:
- What type of document can be uploaded
- What filetypes of document can be uploaded
- The minimum and maximum number of documents that can be uploaded
Note that you must have Production access to Document Income before you can configure this setting; it will not appear if your Production access request has not yet been submitted or approved.
Also note that bank statements are only supported with a custom contract. If you are not contracted for bank statements, do not enable bank statement uploads in your Link customization, as it will cause your /link/token/create calls to fail. To request access to bank statement uploads, contact sales or your account manager.
Data Transparency Messaging
As of October 31, 2024, all new customers launching in the US and/or Canada must select a use case under the Data Transparency Messaging section of the Link customization UI in order to use Link in Production.
Under the Data Transparency Messaging section of the Link customization, you can opt in to Data Transparency Messaging and/or select the use cases that will be displayed in Link during the Data Transparency Messaging flow. For more details, see Data Transparency Messaging Migration Guide.
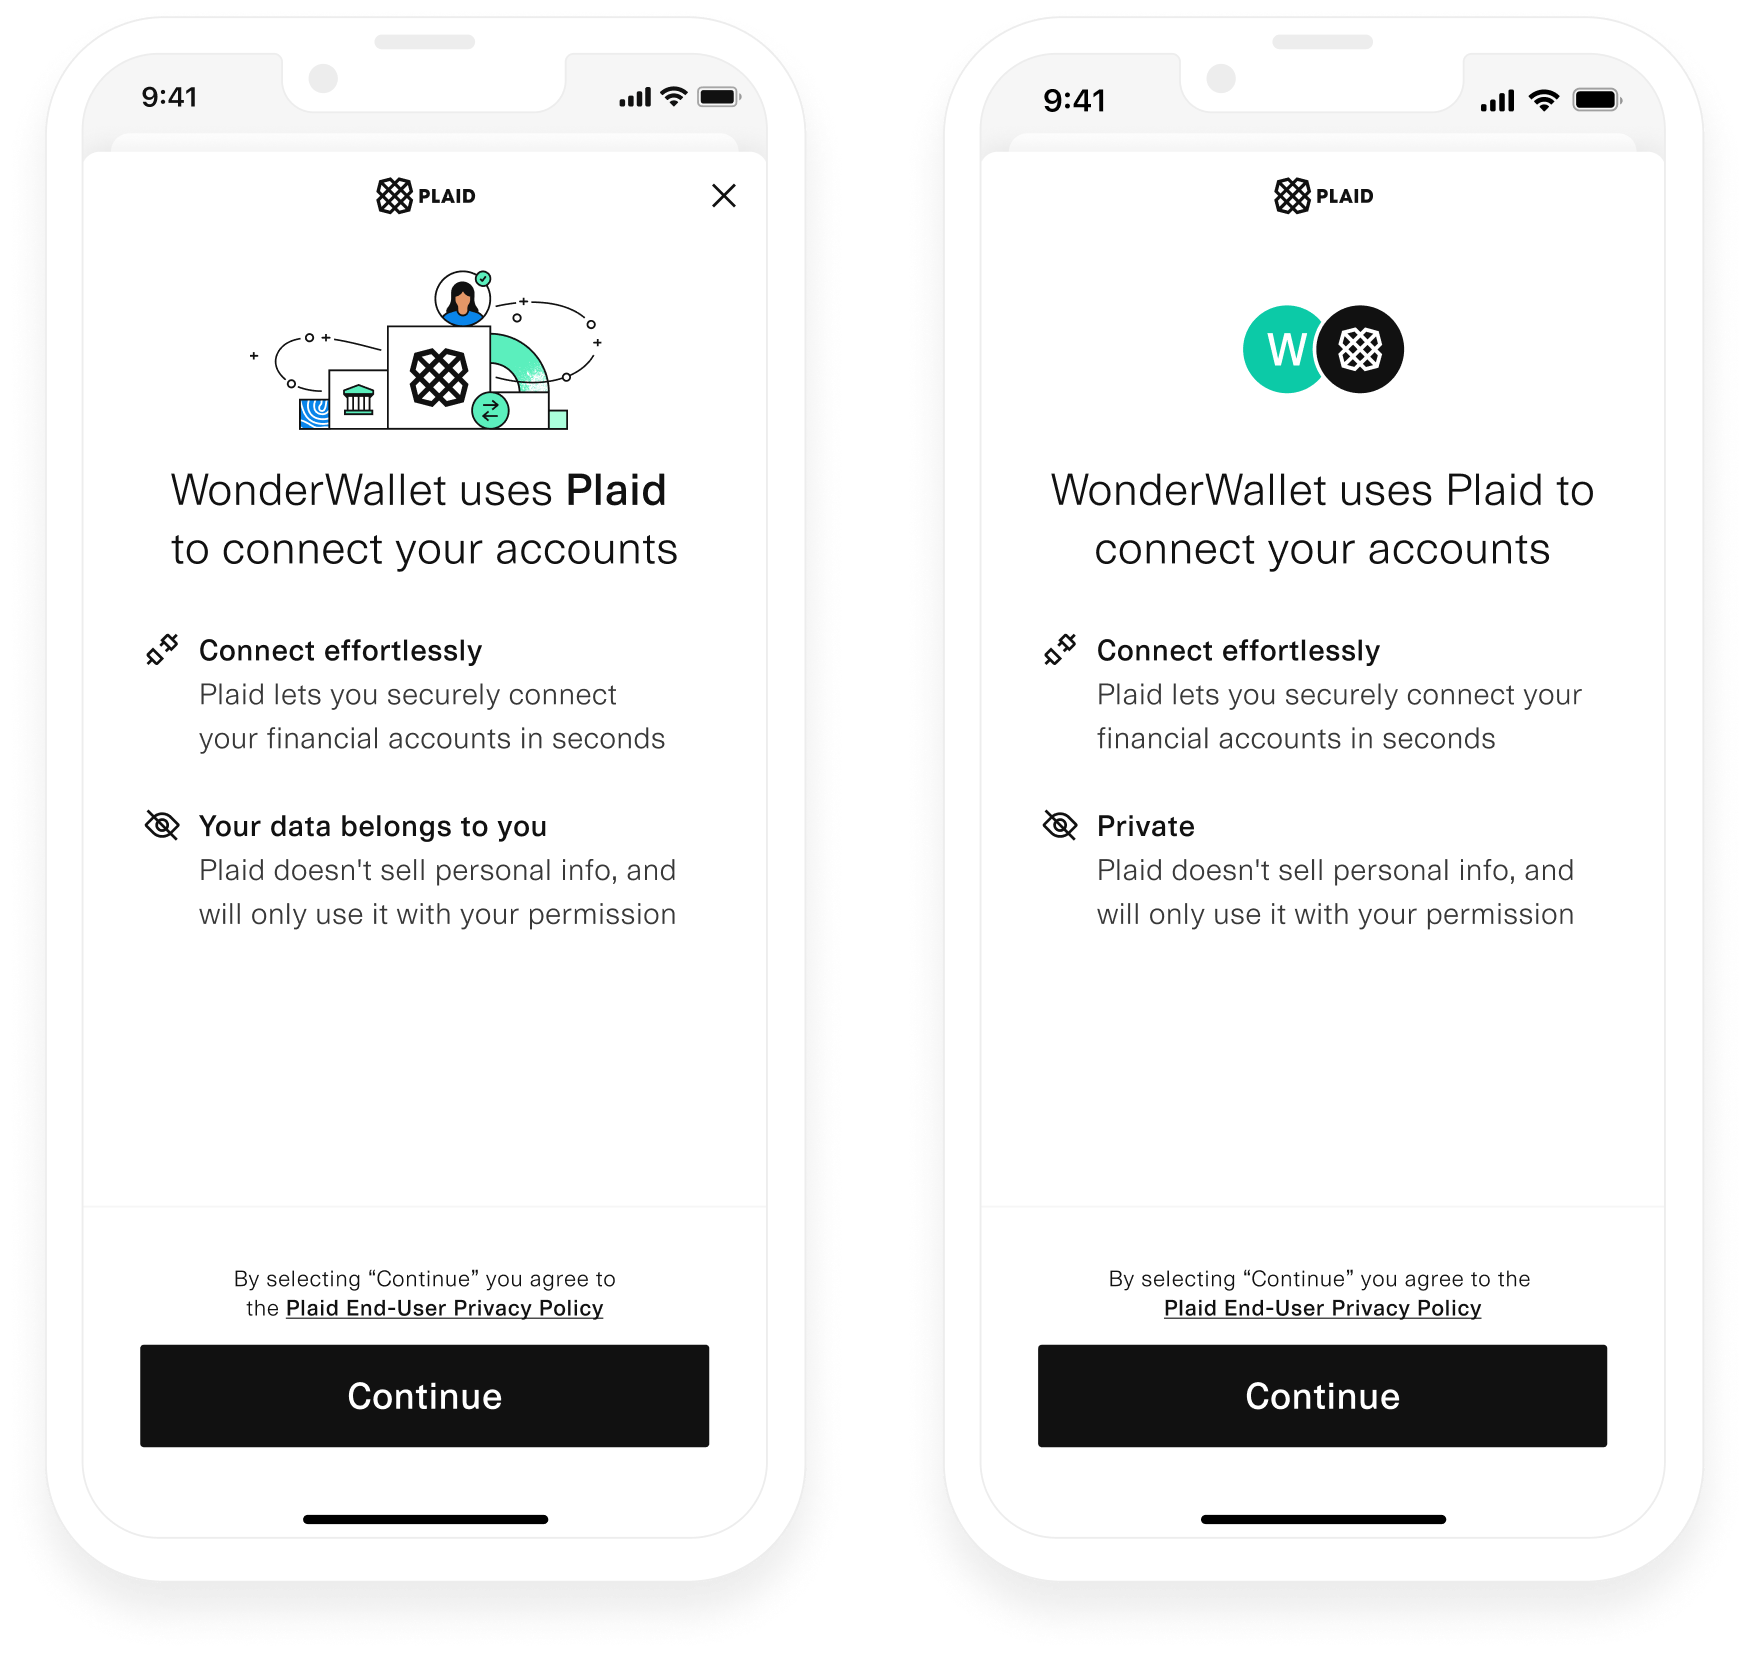
Consent pane customizations
Overview
The Consent pane is what users see when first entering Plaid Link and where they consent to the end-user privacy policy. Plaid offers the option to select whether Plaid branding or a combination of your branding and Plaid's is featured. This latter option includes the ability to upload a brand color as well as a brand logo.
Headlines are standardized based on which products Link is initialized with.
Product-mapped titles
| Product(s) | Title text |
|---|---|
assets, auth, identity, investments, liabilities, transactions | [App name] uses Plaid to connect your [custom field] |
employment (beta) | [App name] uses Plaid to verify your employment |
income_verification | [App name] uses Plaid to verify your income |
This version of the Consent pane is only available to Link customization settings targeting the US and Canada.
Customizing the Consent pane
Within the Link Customization page, under the Consent section, you can choose to activate the Plaid-branded Consent pane or the co-branded Consent pane.
If you choose the co-branded experience, you will see a box that will guide you to choosing your logo, and if you wish, a brand color that will be used for the animation on the loading screen. You must upload a logo (1024 x 1024 .png file) to use the co-branded experience. You can upload a logo or brand color directly within the Consent experience, or you can make the same changes within the Team Settings page.
You can also choose to enable Data Transparency Messaging where you can describe your use case for accessing the data types that you are requesting. Note that enabling Data Transparency Messaging on the Consent pane will prevent your access to products beyond those that you pass to Link. For more information, see Enabling Data Transparency Messaging.
Once you are done configuring your new Consent pane, click Publish and your new changes will go into effect.
Other customizable settings
Several other settings exist to configure Link, outside of the customization pane.
Account subtype filters
Account filters allow you to select which account types and subtypes will be available in Link. For example, if you only want users to link a checking account, you can use Link to display only Items that contain checking accounts. This setting will apply to both the Account Select view and the Institution Select view.
Account filters can be configured via the account_filters parameter when creating a Link token. For details, see /link/token/create.
Account types and subtypes that are not compatible with the products used to initialize Link will be automatically omitted and do not require an account filter setting. For details on account type and subtype compatibility, see the Account type / product support matrix.
For information on using account subtype filters to opt in to showing rent-tech institutions in Link, see Enabling limited purpose checking accounts for rent or mortgage.
Institution Select shortcut
The Institution Select shortcut can be enabled to create a streamlined Link experience for users when you already know which institution the user wants to connect to before initializing Link. For example, this could be the case when migrating to Plaid from an ACH implementation where users manually entered their account and routing number.
You can pass routing_number into the institution_data request field in the /link/token/create endpoint. The matched institution will be listed first in the default list of institutions shown for that session.
If the end user chooses the matched institution, Plaid will send the MATCHED_SELECT_INSTITUTION event callback with metadata {match_reason: routing_number}.