Link token migration guide
How to migrate your application from the public key to a Link token
Support for the public-key based integration mode will end on January 31, 2025. All customers still using the public key-based method of integration must switch to using Link tokens by this date, as public keys will no longer work to launch Link sessions beginning in February 2025.
Introduction
Plaid has introduced a new link_token, which replaces the static public_key. This is an improvement that provides better error validation, more advanced security, and enables Link event logs to be surfaced in the Plaid Dashboard. While Plaid does not plan to discontinue support for existing public_key integrations, it is recommended that you upgrade your integration to use a link_token, as it enables enhanced capabilities, and future Plaid development and features will be based on the link_token infrastructure. Link tokens are also required for new OAuth integrations.
This guide covers the client and server-side changes required to implement the new link_token. Here's an overview of the updates before we dive into the details.

/link/token/create to create a link_token and pass the temporary token to your app's client.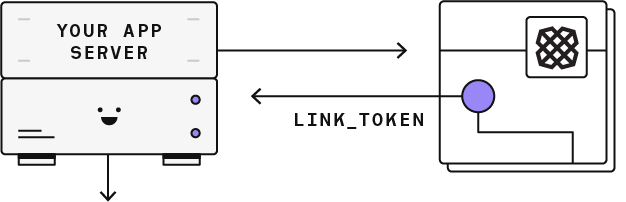
link_token to open Link for your user. In the onSuccess callback, Link will provide a temporary public_token. This token can also be obtained on the backend via /link/token/get.
/item/public_token/exchange to exchange the public_token for a permanent access_token and item_id for the new Item.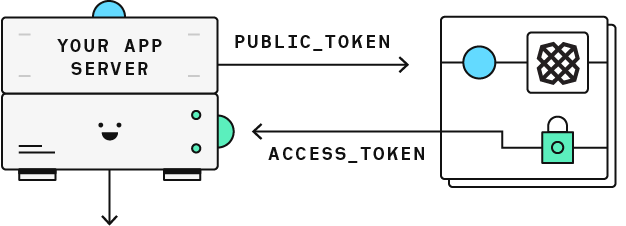
access_token and use it to make product requests for your user's Item.
What's new
- Link will now be initialized with a new
link_token. Thelink_tokenreplaces all previous methods of initializing Link, including thepublic_key(for initial Link), thepublic_token(for update mode), and thepayment_token(for Payment Initiation). - The new endpoint to create the
link_tokenis/link/token/create. - The
INVALID_LINK_TOKENerror code is now available to gracefully handle invalidated tokens. - Link events from sessions created with the new
link_tokenwill be surfaced in the Logs section of the Dashboard. However, Link events from sessions created with thepublic_keywill not.
Link tokens
The link_token is a new type of token that is created by your app's server and passed to your app's client to initialize Link. The Link configuration parameters that were previously set within Link itself are now set via parameters passed to /link/token/create and conveyed to Link via the link_token. If these configurations are still set client-side when using the link_token, they will not have any effect on Link behavior.
Update your integration
The overall process for updating your integration is:
- Update your server to create a
link_token. - Update your client to pass the
link_tokenand handleINVALID_LINK_TOKENerrors. - Ensure you have updated all Link entry points, including those for update mode.
- Test your integration.
- Update any callsites that use the
public_keyfor authentication to use theclient_idandsecretinstead, then re-test those callsites. - Disable the
public_key.
Detailed instructions for each step can be found below.
Update your server
Add a new authenticated endpoint to your app's server to create a link_token by calling /link/token/create.
app.post('/api/create_link_token', async function (request, response) {
  // Get the client_user_id by searching for the current user
  const user = await User.find(...);
  const clientUserId = user.id;
  const linkTokenRequest = {
    user: {
      // This should correspond to a unique id for the current user.
      client_user_id: clientUserId,
    },
    client_name: 'Plaid Test App',
    products: ['transactions'],
    language: 'en',
    webhook: 'https://webhook.example.com',
    redirect_uri: 'https://domainname.com/oauth-page.html',
    country_codes: ['US'],
  };
  try {
    const createTokenResponse = await client.linkTokenCreate(linkTokenRequest);
    response.json(createTokenResponse.data);
  } catch (error) {
    // handle error
  }
});
Many of the parameters to /link/token/create are the same as parameters previously set in Link. Aside from the change to snake case from camelCase, there are a few substantive differences, summarized below. Note that these bullets are only a summary; for the full /link/token/create endpoint definition, see the API Reference.
- A new required parameter,
user.id, has been added. This should be a unique identifier, such as the user ID of the end user in your application. It should not contain personally identifiable information, such as a phone number or email address. languageandcountry_codes, which were previously optional, are now required.accountSubtypeshas been replaced by theaccount_filtersparameter, and its syntax has changed.
In addition, there are a few differences relevant specifically to European integrations:
- The
oauthNonceparameter is no longer used, since it is effectively replaced byuser.id. - For the Payment Initiation product, The
paymentTokenis no longer used, and/payment_initiation/payment/token/createhas been deprecated. Instead, thepayment_idshould be provided to/link/token/createvia thepayment_initiation.payment_idparameter. Initializing Link with the returnedlink_tokenwill launch the Payment Initiation flow.
Authenticate your app
The endpoint used to create a link_token should only be available to users that are logged in to your app. Once your user is logged in, pass an identifier that uniquely identifies your user into the user.client_user_id field. The value of this field should not be personally identifiable information such as an email address or phone number. Using user.client_user_id will allow for easier debugging in the Dashboard logs. You will be able to search for Link logs that belong to one of your end users.
As this update involves an additional API call when adding an Item, create a link_token when your user initially visits your app to avoid adding latency to your Link flow.
Update your client
For each of your web and mobile apps, use the new endpoint you created to fetch a link_token, then pass it into one of Plaid's Link SDKs to initialize Link. You can then safely remove the public_key and other client-side configs that are now configured in the /link/token/create request.
If the token expires or the user enters too many invalid credentials, the link_token can become invalidated. If it does get into an invalid state, Link will exit with an INVALID_LINK_TOKEN error code. By recognizing when this error occurs in the onExit callback, you can generate a fresh link_token for the next time your user opens Link.
Update Link web
The code below demonstrates code that passes the new link_token to Link. For more in-depth coverage on how to integrate with Link web, see the Link web docs.
Note that in the error handling section, in order to handle an invalid link_token for Link in the browser, you will need to gracefully clean up the old iframe before reinitializing Link. To do this, use the destroy() method and reinitialize Link with a new link_token in the onExit callback.
<button id="link-button">Link Account</button>
<script src="https://cdn.plaid.com/link/v2/stable/link-initialize.js"></script>
<script type="text/javascript">
(async function() {
  const fetchLinkToken = async () => {
    const response = await fetch('/create_link_token', { method: 'POST' });
    const responseJSON = await response.json();
    return responseJSON.link_token;
  };

  const configs = {
    // 1. Pass a new link_token to Link.
    token: await fetchLinkToken(),
    onSuccess: async function(public_token, metadata) {
      // 2a. Send the public_token to your app server.
      // The onSuccess function is called when the user has successfully
      // authenticated and selected an account to use.
      await fetch('/exchange_public_token', {
        method: 'POST',
        body: JSON.stringify({ public_token: public_token }),
      });
    },
    onExit: async function(err, metadata) {
      // 2b. Gracefully handle the invalid link token error. A link token
      // can become invalidated if it expires, has already been used
      // for a link session, or is associated with too many invalid logins.
      if (err != null && err.error_code === 'INVALID_LINK_TOKEN') {
        linkHandler.destroy();
        linkHandler = Plaid.create({
          ...configs,
          token: await fetchLinkToken(),
        });
      }
      if (err != null) {
        // Handle any other types of errors.
      }
      // metadata contains information about the institution that the
      // user selected and the most recent API request IDs.
      // Storing this information can be helpful for support.
    },
  };

  var linkHandler = Plaid.create(configs);

  document.getElementById('link-button').onclick = function() {
    linkHandler.open();
  };
})();
</script>
Update Link iOS
The iOS SDK now provides an initWithLinkToken method on both the PLKConfiguration and the PLKPlaidLinkViewController classes that should allow you to easily initialize Link with a link_token.
The code below shows how to initialize Link with the link_token in iOS. For more in-depth coverage on how to integrate with Link iOS, see the iOS docs.
let linkConfiguration = PLKConfiguration(linkToken: "GENERATED_LINK_TOKEN")
let linkViewDelegate = self
let linkViewController = PLKPlaidLinkViewController(
  linkToken: "GENERATED_LINK_TOKEN",
  configuration: linkConfiguration,
  delegate: linkViewDelegate,
)
if (UI_USER_INTERFACE_IDIOM() == .pad) {
    linkViewController.modalPresentationStyle = .formSheet;
}
present(linkViewController, animated: true)
Update Link Android
The Android SDK exposes a new class called LinkTokenConfiguration. This class accepts the link_token and should be passed into the openPlaidLink method.
The code below demonstrates how to use the LinkTokenConfiguration class to open Link. For more in depth coverage on the Android SDK, see the Android docs.
import android.os.Bundle
import android.util.Log
import androidx.appcompat.app.AppCompatActivity

import com.plaid.link.Plaid
import com.plaid.link.linkTokenConfiguration
import com.plaid.link.openPlaidLink
import com.plaid.link.configuration.AccountSubtype
import com.plaid.link.configuration.LinkLogLevel
import com.plaid.link.configuration.PlaidEnvironment
import com.plaid.link.configuration.PlaidProduct
import com.plaid.link.event.LinkEvent
import java.util.Locale

class MainActivity : AppCompatActivity() {

  override fun onCreate(savedInstanceState: Bundle?) {
    super.onCreate(savedInstanceState)

    // Optional
    Plaid.setLinkEventListener { event -> Log.i("Event", event.toString()) }

    // Open Link – put this inside of a Button / Fab click listener
    this@MainActivity.openPlaidLink(
      linkTokenConfiguration {
        // required
        token = "GENERATED_LINK_TOKEN"

        // optional
        logLevel = LinkLogLevel.WARN // Defaults to ASSERT
        extraParams = mapOf() // Map of additional configs
      }
    );
  }
}
Update Link update mode flows
With the introduction of the link_token, /item/public_token/create is deprecated, and Link's update mode is initialized by passing in a link_token rather than a public_token. You can obtain this link_token by calling /link/token/create and providing the user.id of the user whose Item is being updated, along with the access_token for the Item. Make sure to update any update mode flow entry points in addition to updating primary Link flows. For more details and complete sample code, see Updating Items via Link.
// Initialize Link with the token parameter
// set to the generated link_token for the Item
const linkHandler = Plaid.create({
  token: 'GENERATED_LINK_TOKEN',
  onSuccess: (public_token, metadata) => {
    // You do not need to repeat the /item/public_token/exchange
    // process when a user uses Link in update mode.
    // The Item's access_token has not changed.
  },
  // ...
});
Test in Sandbox
Once you have updated both your app's client and server, it's time to test that your integration works. The best way to test is by using the test credentials in the Sandbox:
username: user_good
password: pass_good
Test your error handling flow for INVALID_LINK_TOKEN by using the Sandbox test credentials to force an error:
username: user_custom
password: { "force_error": "INVALID_LINK_TOKEN" }
You can also verify that you have updated correctly by viewing Link event logs in the Plaid Dashboard.
To test your update mode implementation, use the /sandbox/item/reset_login endpoint to force an Item into a state that requires an update, then walk through the test steps above.
Update API endpoints
In order to completely migrate off of the public_key, there are a few Plaid API endpoints that should replace the public_key with the client_id and secret: /institutions/search, /institutions/get_by_id, and /sandbox/public_token/create.
Because the client_id and secret are now used to authenticate the endpoints above, they should only be called from your server. The ability to call them from the client has been removed in the latest client library updates.
Disable the public key
After completing all of the above steps, you can now confidently disable the public_key via the Plaid Dashboard. This can be done on a per-environment basis, with different settings for Sandbox and Production, to help you test your migration. The public_key can also be disabled separately for Link and for the API. Disabling it for Link means you will be required to use the link_token to initialize Link. Disabling it for the API means that you will be required to use the client_id and secret to call /institutions/search, /institutions/get_by_id, and/sandbox/public_token/create.
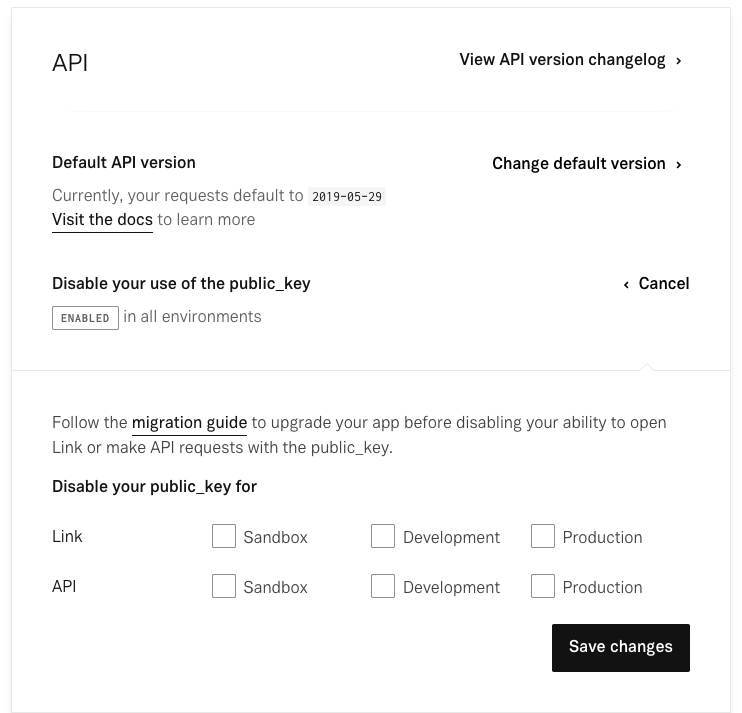
It is recommended you disable the public_key as soon as possible to ensure that you do not accidentally add legacy public_key-dependent code to your application.
Conclusion
Congratulations on upgrading to the new link_token! If you require any help migrating to the link_token integration, please contact Plaid Support for assistance.