
Get started with the Quickstart
A quick introduction to building with Plaid
Want more video tutorials? The full getting started guide for the Quickstart app is available on YouTube.
Don't want to write code? Check out the Plaid Postman Collection for a no-code way to get started with Plaid's API.
Looking to get started with Identity Verification, Income Verification, Plaid Check (CRA), or Layer?
For Identity Verification, check out the Identity Verification Quickstart.
For Plaid Check (CRA), check out the Plaid Check (CRA) Quickstart.
For Income, try the Income Verification Starter app.
For Layer, use the Layer Quickstart.
Introduction
These instructions are also available on GitHub at the Quickstart Repo.
Let's test out running Plaid locally by cloning the Quickstart app. You'll need API keys, which you can receive by signing up in the Dashboard.
You'll have two different API keys, and there are two different Plaid environments. Today we'll start in the Sandbox environment. View the API Keys section of the Dashboard to find your Sandbox secret.
API Key
View Keys in DashboardEnvironment
If you get stuck at any point in the Quickstart, help is just a click away! Check the Quickstart troubleshooting guide, ask Bill — Plaid's AI assistant — in the Dashboard, or chat with other developers in our Discord community.
Quickstart setup
Once you have your API keys, it's time to run the Plaid Quickstart locally! The instructions below will guide you through the process of cloning the Quickstart repository, customizing the .env file with your own Plaid client ID and Sandbox secret, and finally, building and running the app.
Make sure you have npm installed before following along. If you're using Windows, ensure you have a terminal capable of running basic Unix shell commands.
# Note: If on Windows, run
# git clone -c core.symlinks=true https://github.com/plaid/quickstart
# instead to ensure correct symlink behavior

git clone https://github.com/plaid/quickstart.git

cd quickstart/node

# Copy the .env.example file to .env, then fill
# out PLAID_CLIENT_ID and PLAID_SECRET in .env
cp .env.example .env

# Install dependencies
npm install

# Start the backend app
./start.sh
Open a new shell and start the frontend app. Your app will be running at http://localhost:3000.
# Install dependencies
cd quickstart/frontend
npm install

# Start the frontend app
npm start

# Go to http://localhost:3000
Visit localhost and log in with Sandbox credentials (typically user_good and
pass_good, as indicated at the bottom of the page).

Create your first Item
Most API requests interact with an Item, which is a Plaid term for a login at a financial institution. A single end-user of your application might have accounts at different financial institutions, which means they would have multiple different Items. An Item is not the same as a financial institution account, although every account will be associated with an Item. For example, if a user has one login at their bank that allows them to access both their checking account and their savings account, a single Item would be associated with both of those accounts.
Now that you have the Quickstart running, you'll add your first Item in the Sandbox environment. Once you've opened the Quickstart app on localhost, click the Launch Link button and select any institution. Use the Sandbox credentials to simulate a successful login.
Sandbox credentials
username: user_good
password: pass_good
If prompted to enter a 2FA code: 1234
Once you have entered your credentials and moved to the next screen, you have created your first Item! You can now make API calls for that Item by using the buttons in the Quickstart. In the next section, we'll explain what actually happened and how the Quickstart works.
How it works
As you might have noticed, you use both a server and a client-side component to access the Plaid APIs. The flow looks like this:

/link/token/create to create a link_token and pass the temporary token to your app's client.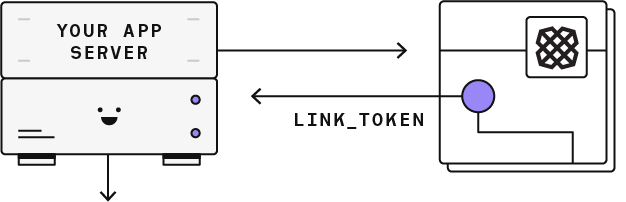
link_token to open Link for your user. In the onSuccess callback, Link will provide a temporary public_token. This token can also be obtained on the backend via /link/token/get.
/item/public_token/exchange to exchange the public_token for a permanent access_token and item_id for the new Item.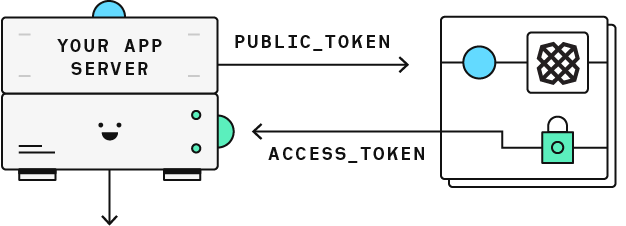
access_token and use it to make product requests for your user's Item.
The first step is to create a new link_token by making a /link/token/create request and passing in the required configurations. This link_token is a short-lived, one-time use token that authenticates your app with Plaid Link, our frontend module. Several of the environment variables you configured when launching the Quickstart, such as PLAID_PRODUCTS, are used as parameters for the link_token.
app.post('/api/create_link_token', async function (request, response) {
  // Get the client_user_id by searching for the current user
  const user = await User.find(...);
  const clientUserId = user.id;
  const linkTokenRequest = {
    user: {
      // This should correspond to a unique id for the current user.
      client_user_id: clientUserId,
    },
    client_name: 'Plaid Test App',
    products: ['auth'],
    language: 'en',
    webhook: 'https://webhook.example.com',
    redirect_uri: 'https://domainname.com/oauth-page.html',
    country_codes: ['US'],
  };
  try {
    const createTokenResponse = await client.linkTokenCreate(linkTokenRequest);
    response.json(createTokenResponse.data);
  } catch (error) {
    // handle error
  }
});
Once you have a link_token, you can use it to initialize Link. Link is a drop-in client-side module available for web, iOS, and Android that handles the authentication process. The Quickstart uses Plaid's optional React bindings for an integration that you trigger via your own client-side code. This is what your users use to log into their financial institution accounts.
After a user submits their credentials within Link, Link provides you with a public_token via the onSuccess callback. The code below shows how the Quickstart passes the public_token from client-side code to the server. Both React and vanilla JavaScript examples are shown.
// APP COMPONENT
// Upon rendering of App component, make a request to create and
// obtain a link token to be used in the Link component
import React, { useEffect, useState } from 'react';
import { usePlaidLink } from 'react-plaid-link';
const App = () => {
  const [linkToken, setLinkToken] = useState(null);
  const generateToken = async () => {
    const response = await fetch('/api/create_link_token', {
      method: 'POST',
    });
    const data = await response.json();
    setLinkToken(data.link_token);
  };
  useEffect(() => {
    generateToken();
  }, []);
  return linkToken != null ? <Link linkToken={linkToken} /> : <></>;
};
// LINK COMPONENT
// Use Plaid Link and pass link token and onSuccess function
// in configuration to initialize Plaid Link
interface LinkProps {
  linkToken: string | null;
}
const Link: React.FC<LinkProps> = (props: LinkProps) => {
  const onSuccess = React.useCallback(async (public_token, metadata) => {
    // send public_token to server
    const response = await fetch('/api/set_access_token', {
      method: 'POST',
      headers: {
        'Content-Type': 'application/json',
      },
      body: JSON.stringify({ public_token }),
    });
    // Handle response ...
  }, []);
  const config: Parameters<typeof usePlaidLink>[0] = {
    token: props.linkToken!,
    onSuccess,
  };
  const { open, ready } = usePlaidLink(config);
  return (
    <button onClick={() => open()} disabled={!ready}>
      Link account
    </button>
  );
};
export default App;
Next, on the server side, the Quickstart calls /item/public_token/exchange to obtain an access_token, as illustrated in the code excerpt below. The access_token uniquely identifies an Item and is a required argument for most Plaid API endpoints. In your own code, you'll need to securely store your access_token in order to make API requests for that Item.
app.post('/api/exchange_public_token', async function (
  request,
  response,
  next,
) {
  const publicToken = request.body.public_token;
  try {
    const tokenResponse = await client.itemPublicTokenExchange({
      public_token: publicToken,
    });

    // These values should be saved to a persistent database and
    // associated with the currently signed-in user
    const accessToken = tokenResponse.data.access_token;
    const itemID = tokenResponse.data.item_id;

    response.json({ public_token_exchange: 'complete' });
  } catch (error) {
    // handle error
  }
});
Making API requests
Now that we've gone over the Link flow and token exchange process, we can explore what happens when you press a button in the Quickstart to make an API call. As an example, we'll look at the Quickstart's call to /accounts/get, which retrieves basic information, such as name and balance, about the accounts associated with an Item. The call is fairly straightforward and uses the access_token as a single argument to the Plaid client object.
app.get('/api/accounts', async function (request, response, next) {
  try {
    const accountsResponse = await client.accountsGet({
      access_token: accessToken,
    });
    prettyPrintResponse(accountsResponse);
    response.json(accountsResponse.data);
  } catch (error) {
    prettyPrintResponse(error);
    return response.json(formatError(error.response));
  }
});
Example response data:
{
  "accounts": [
    {
      "account_id": "A3wenK5EQRfKlnxlBbVXtPw9gyazDWu1EdaZD",
      "balances": {
        "available": 100,
        "current": 110,
        "iso_currency_code": "USD",
        "limit": null,
        "unofficial_currency_code": null
      },
      "mask": "0000",
      "name": "Plaid Checking",
      "official_name": "Plaid Gold Standard 0% Interest Checking",
      "subtype": "checking",
      "type": "depository"
    },
    {
      "account_id": "GPnpQdbD35uKdxndAwmbt6aRXryj4AC1yQqmd",
      "balances": {
        "available": 200,
        "current": 210,
        "iso_currency_code": "USD",
        "limit": null,
        "unofficial_currency_code": null
      },
      "mask": "1111",
      "name": "Plaid Saving",
      "official_name": "Plaid Silver Standard 0.1% Interest Saving",
      "subtype": "savings",
      "type": "depository"
    },
    {
      "account_id": "nVRK5AmnpzFGv6LvpEoRivjk9p7N16F6wnZrX",
      "balances": {
        "available": null,
        "current": 1000,
        "iso_currency_code": "USD",
        "limit": null,
        "unofficial_currency_code": null
      },
      "mask": "2222",
      "name": "Plaid CD",
      "official_name": "Plaid Bronze Standard 0.2% Interest CD",
      "subtype": "cd",
      "type": "depository"
    },
    ...
  ],
  "item": {
    "available_products": [
      "assets",
      "balance",
      "identity",
      "investments",
      "transactions"
    ],
    "billed_products": ["auth"],
    "consent_expiration_time": null,
    "error": null,
    "institution_id": "ins_12",
    "item_id": "gVM8b7wWA5FEVkjVom3ri7oRXGG4mPIgNNrBy",
    "webhook": "https://requestb.in"
  },
  "request_id": "C3IZlexgvNTSukt"
}
Next steps
Congratulations, you have completed the Plaid Quickstart! From here, we invite you to modify the Quickstart code in order to get more practice with the Plaid API. There are a few directions you can go in now:
Go to the docs homepage for links to product-specific documentation.
For more sample apps, including a bare-bones minimal Plaid Quickstart implementation and apps demonstrating real world examples of funds transfer and personal financial management, see sample apps.
Our YouTube playlist Plaid in 3 minutes has brief introductions to many Plaid products. For more detailed tutorial videos, see Plaid Academy.
Looking to move money with a Plaid partner, such as Dwolla? See Move money with our partners for partner-specific money movement Quickstarts.
The Quickstart covers working with web apps. If your Plaid app will be on mobile, see Plaid Link to learn about getting started with mobile client-side setup.
If you'd like to integrate with Plaid and don't have in-house technical resources, contact a Plaid integration partner to build a Plaid integration for you.